Vivo X80 intelligent answering setting method
Vivo will launch a new model, the Vivo X80, in 2022. After a series of evaluations and uses, this mobile phone can be said to be perfect and highly configured. However, many small partners care about one detail: the details of phone answering, and the setting method of the Vivo X80 intelligent answering. Come and have a look.
How to use vivo x80 intelligent answering
1. First, open the mobile phone desktop, find the setting icon and click it.
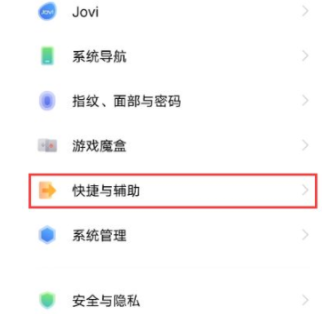
2. After entering the setting page, find the shortcut and auxiliary options and click Enter.
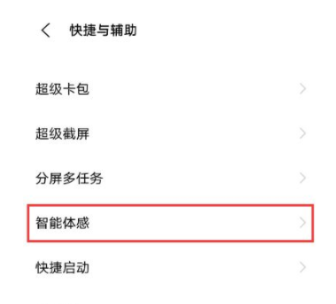
3. Find the agent sense option and click to enter.
4. Click Smart Sense to enter the Smart Sense setting page, where you can see the smart call options.
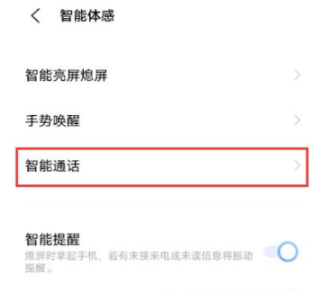
5. Click smart call to enter the setting page of smart call, where you can see the smart answer option, and turn on the right switch.
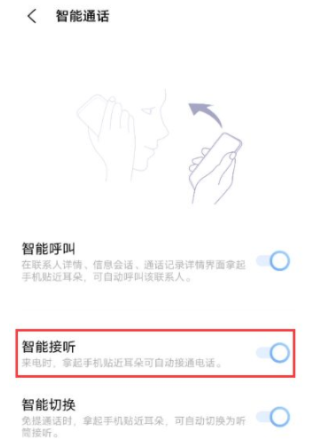
6. After the intelligent answering function is enabled, when we want to answer the phone, we just need to pick up the phone close to the ear to answer the phone.
7. We can also set intelligent switching. When making a handsfree call, you can pick up the phone close to your ear and switch to the receiver to answer.
8. We can also set to enable the hands-free answering of swipe. When calling, you can choose to swipe the phone with your palm from the top of the phone for 3-5 cm, so that the phone can answer the phone handsfree, which is convenient for our daily life.
The use method of vivo x80 intelligent answering is shown above. In fact, this function is not very commonly used, but for some children, they will set this function when they change a phone. They are very accustomed to the existence of this function, so you can follow the relevant steps above.